My blog has moved!

You should be automatically redirected in 6 seconds. If not, visit
http://www.midnightmaniac.com
and update your bookmarks.

envirambo

See me morph into action at the Green Phone Booth
Add to Technorati Favorites

the flock


follow me on twitter

follow me on facebook
Break the Bottled Water Habit
Eco Friendly, Environment & Green Blogs - BlogCatalog Blog Directory
Showing posts with label thrifty. Show all posts

Monday, March 23, 2009

Cutting the "Junk" out of Junk Food.

My family husband is a junk food junkie.  Our grocery list routinely states "Candy for Randy".  It is like a staple at the top of the list: Milk, eggs, butter, candy.  I always feel a little odd when the cashier unearths these items.   Hidden under a mass of nutrition from the other end of the spectrum: Organic, organic, milk, milk, milk, organic, produce, produce, orange slices, sour cherry balls, anise dolls, organic, organic, produce...  I try to avoid eye contact.

Then there is the immediate foraging for snacks upon entering the door after a long days work.  After a quick greeting it is straight for the chips!  He will easily consume an entire bag in one sitting, before dinner.   We, he, was going through three or four bags of potato chips a week.  Concerned this may not be the ideal choice, I switched his snacking from conventional greasy potato chips to organic tortilla chips.  Still not exactly healthy, but better I thought.  This was the routine for several months.

Now I have reached the point where I am tired of spending the nearly $3.00 per bag and sick of throwing all those bags away.  Think of all the money and waste we would save by making our own snacks!


Share/Save/Bookmark

Friday, February 27, 2009

Strange side effects of life at 55...


Degrees.

In an effort to curb our atrocious fuel oil consumption, mostly to reign in the exorbitant bill that inevitably comes with it, I set our thermostat at 55 degrees back in November and we have been freezing our buns off ever since.  Okay not really, but keeping our house at a constant cool 55 degrees in Wisconsin has brought about some unexpected side effects.


1.  Your plants die.
Apparently there is a reason palm trees grow in tropical regions.  Sadly, my 8 foot palm tree is half dead.  I should have pulled it into the interior of the house, but the solarium receives the most light.  I guess it needed warmth and light.  I am not sure it is going to survive the winter.

2.  Bread never rises.
Proofing dough requires warmth.  We have none, or at least very little.  Baking bread was a laborious weekend long project.  I would follow the sun; moving my bowl of dough from room to room, letting it rest on the floor in a sunny spot.  Eventually, it would end up overnight in the upstairs bathroom, seemingly the warmest place in the house.  Until you stepped out of the shower that is.  Holy sh*t it's cold in here!  Luckily, Santa brought me a bread machine for Christmas.

3. Room temperature butter.
Nearly all baking calls for room temperature butter.  Just whose room are they referring to?  Obviously not mine.  Room temperature butter in this house is still rock hard.  Frustrating to a budding baker who spends hour after hour asking, "Is this soft enough?".  Three hours is about as patient as she can be.  Her cookies always taste good, they just come out a little flat.

4.  Friends and family come equipped with their own slippers.
On the rare occasion someone is actually brave enough to visit you in "Siberia", they bring half their bedroom with them.  It did not take long for our family to start showing up with slippers in tow.  We do not wear shoes in the house, but several pair of socks and slippers are a must to prevent frostbite on your little piggies.

5.  Athletes foot.
This is something you would expect in much warmer temperatures.  All those socks and slippers I referred to above?  Pair that with leaping from the shower and getting dressed in less than 30 seconds.  Does not leave a whole lot of time for drying off.  My feet go directly from shower to socks and stay there indefinitely until the next shower.  So yeah, athletes foot.

6.  Clothes can be "forgotten" in the washer without becoming "funky".
You know what I am talking about.  You do a load of laundry late in the evening and are too tired/lazy to hang it.  I'll get it in the morning.  Morning comes and you forget all about it.  Two days later you open the washer to throw in a load and eww... What's that smell?  Funky clothes.  Damn.  Oh contrare monfrare!  Not in a cold house.  Clothes can sit in there for days without acquiring a musty smell.  Much like food in the refrigerator.

7.  Your washer freezes, along with the clothes in it.
Our laundry room is also our mud-room and entry to the house.  It is a small enclosed heated porch, but not insulated.  The only heat vent is directly beside the washer, about an inch away.  Last year this was never a problem, but then our thermostat was set slightly higher at 62.  Felt cold then, would be a heat wave now.  At 55, our furnace does not run nearly as much, which is the point, but on really cold days the washer will freeze.  Luckily we have had no accidents or broken pipes, only a few giggles when pulling frozen underwear from the washer.

8.  There is no need to apply blush.
My cheeks maintain a youthful rosy glow from the chill in the air.  I'm not just talking about the ones on my face either.  My hands, on the other hand, ha ha are an eery shade of purple.  Like a corpse, but that is another story.

9.  Steam rises from my Diva Cup.
Strange, but true.  That actually happened once and it totally freaked me out.  A sudden drop of 43 degrees and you can visibly see the temperature change.  Just like seeing your breath on a cold winter day.

10.  You are either asked, "Are you leaving?" or "Did I wake you?".
We dress in layers, lots of layers.  On any given day I am wearing long underwear, socks, jeans, multiple shirts, sweatshirt or down vest, fingerless gloves, scarf, and fleece jacket.  And of course, slippers.  But, that goes without saying.  Inevitably, surprise guests think I am on my way out.  Or, on really cold days we can be seen wandering around the house all hours in a bathrobe (over our layers clothes).  They really hold the heat in.

No, I've been up for hours.  Come on in - hope you brought your slippers.


Share/Save/Bookmark

Monday, February 16, 2009

Design on a Dime.


What do you do when challenged to come up with table centerpieces for a sports award banquet attended by 280 guests with a $5.00 budget? Oh, and you have seven days to accomplish your mission?

If you are wondering why things have been so quiet around here the past two weeks, my Monday post at The Green Phone Booth might give a clue.


Share/Save/Bookmark

Tuesday, January 27, 2009

Safety First


Back in October, I made the leap from disposable razors to shaving with a safety razor and have never looked back. I absolutely love it! I am in my fourth month and have only changed the blade once. My original estimate was one blade per month, with a savings of $236 - $336 and not having to buy blades again for eight years! At this rate I can double that!


So far I have only nicked myself a total of maybe three times. I would have done so with a regular razor also. Ankles and knees sometimes get the best of me when shaving half asleep. It takes no more time than it did when shaving with a disposable. I have nothing but praise for the safety razor. I like it so much that I gave one to the chitlin girl for Christmas.

She left the next day to spend the rest of Christmas break with her mother. I had not thought about it since. The other day I remembered that I never showed her how to use it.

So I asked, "Did you figure out how to use the safety razor?"

She replied, "Yes, it took me a little while to figure out how to open it, but I got it."

"So how is it going?" I pressed on.

She looked at me quizzically, "What do you mean?"

"Well, have you cut yourself yet?" Bracing myself for the answer.

"Why would I cut myself?"

So, there you have it folks. The safety razor: So easy a 12 year old can do it!

Share/Save/Bookmark

Thursday, January 22, 2009

Thrifty Green Thursday - Throwing in the towel.


Household paper goods are so ubiquitous we do not even think about them anymore, but there was a time when towels and napkins were made of soft, reusable cloth. Nowadays the equivalent of about 270,000 trees are used and discarded each day worldwide. the average North American churns through 50 pounds of paper products a year, including napkins, paper towels, tissues, and toilet paper. While some of these goods are made from sustainable tree farms, native forests are still a primary source. This leads to erosion and loss of animal habitats. Plus, papermaking is a toxic process that is hard on the environment. Many paper products are whitened with chlorine-based chemicals - which are not as harmful as chlorine bleach, but still release carcinogens and toxins into the water. Others are scented, dyed, or treated with "lotion" made of petroleum, silicone, and chemical surfactants.


Thinner paper is more environmentally friendly than thick or quilted varieties. Use paper towels sparingly and reuse them when practical; some brands can be rinsed numerous times. Buy only plain, unscented, white, lotion-free toilet paper and tissues, which are better for the environment.

Help reduce chlorine-related dioxins in the air and water by purchasing paper products that have been whitened with hydrogen peroxide, oxygen, or ozone bleach. "Totally chlorine free" (TCF) is best, "processed chlorine free" (PCF) is at least made without the most harmful type of chlorine, and "elemental chlorine free" (ECF) is the least desirable, but better than conventional paper goods. Unbleached paper products are the best choice.

Look for products made of recycled paper. Among the recycled papers, a high postconsumer waste (PCW) content is best, because it keeps paper out of landfills and reduces the need to use virgin wood fiber. Recycled papers usually list the amount of PCW on their packaging; look for varieties with the highest PCW percentage you can find.


Use cloth napkins and wash them when they are soiled; they are more absorbent than some of the "eco" paper brands. Substitute sponges, dishcloths, or kitchen towels for paper towels. A good way to start is to throw a dish towel over your paper-towel rack, as a reminder to dry your clean hands, countertops, and dishes with a reusable cloth towel instead of a disposable paper one.

Our everyday napkins.

Over a year ago I purchased two packs of dish cloths. We have been using them as our everyday napkins ever since. They have survived spaghetti sauce, BBQ sauce, ketchup, mustard, butter, chocolate milk, many spills, and many messy eaters.

Hand drying towels.

How many paper towels does it take to dry your hands? One, two? One never seems like quite enough, but one cloth towel is all it takes to get the job done. Our hand drying towels consist mostly of the flour sack variety. They are thin and therefore dry fast. I like to throw one over my shoulder while working in the kitchen for quick access. Otherwise, one is always hanging on the oven door pull - which acts as a dryer while baking.

Cleaning towels.

I prefer cloth versus paper when cleaning up spills - no matter how messy and disgusting they are. With cloth one is enough to clean my entire kitchen, it holds up to scrubbing, rinsing is not a problem, it is far more economical, does not come packaged in plastic, and I never run out. These "bar towels" are just the right size for wiping down counters, scrubbing the stove top, cleaning the refrigerator, and catching spills.

By investing just a few bucks I have drastically reduced our waste, my trips to the store, dioxins in our air and water, trees being cut for virgin wood fibers, and plastic packaging; all while getting a far better return on my investment than the one time use and disposal of paper towels.


Share/Save/Bookmark


Tuesday, January 13, 2009

MYO Basic White Sauce

Keeping with the theme of Make Your Own, Béchamel, a basic white sauce is something every home cook should have in their culinary back pocket. I have been known to whip it out on unprepared nights when the family is staring at me asking, "What's for dinner?". Pasta, tuna, and veggies in a creamy white sauce - no problem. Homemade mac and cheese - coming right up. Fettuccine Alfredo - simple, set the table.

BASIC WHITE SAUCE

Melt 2 tablespoons butter in a saucepan over medium heat. Add 1/4 cup all-purpose flour and stir 1 minute to cook out raw flour taste. Gradually whisk in 1 cup milk, whisking constantly to prevent lumps. Add 1 teaspoon salt, 1/8 teaspoon ground black pepper, and 1/8 teaspoon grated nutmeg (optional). Add another 1 cup milk and whisk constantly until thick and simmering. Cook until very thick and smooth, 2 to 3 minutes. Makes about 2 cups.


Serve as is with pasta, veggies or whatever you choose; or, use it as a base for other dishes. Add some paprika, cayenne pepper, and a few red pepper flakes to use it a a spicy sauce for sausage and gravy over biscuits.

ALFREDO SAUCE

Throw in
2 tablespoons cream cheese, 1 clove of minced garlic, 1 cup of grated Parmesan. Top with parsley flakes and you have a quick and easy Alfredo sauce. The Chitlins are Alfredo fiends! I have made several versions and I like this one the best because it does not separate when leftovers are stored in the refrigerator. We used to spend over $3.00 on a jar of processed Alfredo sauce. This is so easy to make and tastes waaay better.


CHEDDAR CHEESE SAUCE

After the basic white sauce has cooked and thickened, stir in
1 1/2 cups (6 ounces) shredded sharp or extra-sharp Cheddar cheese, 1 teaspoon paprika, 1 teaspoon Dijon mustard (optional), and 1/8 teaspoon ground red pepper. Makes about 3 1/2 cups. Stir in cooked elbow noodles or shells for homemade mac and cheese. You can leave the mustard out, but it really does taste better with it. I do not even like mustard, but always include it. The Chitlins have never complained about it either. If you want a golden crust, top your mac and cheese with buttered bread crumbs and broil until desired color.


Once you get the basic recipe down, add ingredients to vary dishes to your heart's content. Use what you have on hand. The ingredients needed are almost always already in your kitchen. Save a trip to the grocery store and skip the extra packaging of over-priced processed "food". Béchamel is cheap and easy, the leftovers store well, and you will never have to panic again when someone utters the dreaded, "What's for dinner?".

Share/Save/Bookmark

Monday, January 12, 2009

Make Your Own

With the economy in a slump and the future of the environment in question a lot more people are looking for ways to consume less and make do with what they already have. From learning to sew, make repairs, grow a garden, and cook from scratch there is a whole lot of DIY going on. Lately I have noticed a new buzz in the blogosphere - MYO. Make Your Own certainly is not a new concept; for generations before us it was a way of life, there just is a lot of talk about it as of late.

In the past week alone a slew of posts have popped up.

Make Your Own:
mayonnaise
liqueur
apple sauce
apple cider vinegar
tortillas & enchilada sauce
marshmallows
vanilla ice cream
deodorant
sunscreen
foot scrub

Heck, I have even posted about MYO bread & butter, automatic dishwasher detergent, and menstrual pads. I do not know if it is the winter weather or some new found feeling of empowerment, but lately I look at something and think, "Why buy it? I can make that!". Becoming disgusted with plastic and over packaging has also been a motivational push in making my own.

Here are three things we use a lot of that are super simple to Make Your Own.

KETCHUP

1 (6-ounce) jar tomato paste
1/2 cup carrot puree
1/4 cup water
2 tablespoons apple-cider vinegar
2 cloves garlic, minced
1 tablespoon firmly packed brown sugar (optional)
1/2 teaspoon dry mustard
1/4 teaspoon salt
1/4 teaspoon ground allspice
1/4 teaspoon chili powder, or to taste

1. Stir all ingredients together in a big sauce pan and bring to a boil over medium-high heat. Reduce the heat and simmer until the mixture has reduced by about half, 15 to 20 minutes. Let it cool before serving.
2. Refrigerate in an airtight container for up to 5 days, or freeze in 1/4-cup amounts for up to 3 months.

I find a muffin tin works great for freezing the 1/4 portions. Once frozen, remove from muffin pan and place in container of your choice. When needed, pull out the desired portions, thaw, and serve! The next recipe utilizes your frozen ketchup portions.

BBQ Sauce

1/4 cup ketchup
2 tablespoons brown sugar
1 tablespoon apple cider vinegar
1 tablespoon Worcestershire sauce
1 tablespoon Chipotle Chile powder

Combine all ingredients in a glass microwave safe bowl, stirring well.
Microwave at high one minute or until thoroughly heated. Enjoy!


Since this uses your homemade ketchup it will only keep refrigerated for the same amount of time. I only make it as needed so there is never any to store; however, you could make a larger batch and freeze just like the ketchup.

This last one I usually ask the Chitlins to make - it is that easy.

TACO SEASONING

1 tablespoon chili powder
1/4 teaspoon garlic powder
1/4 teaspoon onion powder
1/4 teaspoon crushed red pepper flakes
1/4 teaspoon dried oregano
1/2 teaspoon paprika
1 teaspoon ground cumin
1 teaspoon sea salt
1 teaspoon black pepper

Put all ingredients in small jar, shake to mix.
Use 2 tablespoons to season meat.


I cannot believe I used to spend a buck on those little packets full of sodium! All the ingredients needed were wasting away in my spice cabinet. Never again. Follow amounts listed to use as needed; or, quadruple to have extra on hand. On a side note, I have found that taco meat makes super awesome chili.

Now that I have a few simple MYO recipes under my belt I would like to expand my repertoire. For 2009 my goals are:

yogurt
sour cream
mozzarella
ice cream
chocolate syrup
granola
stock/broth
cream of chicken/mushroom
pasta sauce
pasta
deodorant
laundry soap
compost/fertilizer

If you have any tried and true recipes for the list above, please post it in the comments or leave a link to your blog where you have posted about it. Other MYO suggestions/recipes are also welcome.

Share/Save/Bookmark

Thursday, January 8, 2009

Thrifty Green Thursday - Bread & Butter


Santa did not bring me worms for Christmas like I had hoped, but he did bring me a gift that keeps on giving. Keeps on giving him bread. I got a shiny new bread machine.


I just started baking my own bread a few months ago with lackluster results. I had grand aspirations of eliminating plastic bread bags, saving money, and impressing my family with my domestic skill while making the house smell great. Instead I got oddly shaped-hard-dense loaves, entire days lost to "bread making", bread shortages, and emergency runs to the store to buy bread.


So when I unwrapped my new toy on Christmas day I thought my prayers had been answered. Yes! Now we can enjoy some real bread. I am still not sure if the gift was for me or hubby. Either way it does not vouch well for my bread baking artistry. I had such high hopes for this machine. You put the ingredients in and take the bread out. Perfect! Nothing for me to mess up.


Then explain this. Is it a chef's hat? A giant popover? What? It certainly cannot be a loaf of bread from my new magic machine. Can it? Damn. I have made three different loaves and none were good. I had better luck the old fashioned way. What am I doing wrong? Is there some secret bread baking society that I am banned from, a gluten gene I lack, or am I just doomed to forever eat mass produced bread out of a plastic bag? The only somewhat success that has come out of this is a batch of cinnamon rolls and butter.


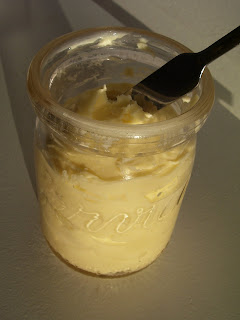
Yes, butter. Since I was having no luck on the bread front I thought I would try to at least make its topping good. Homemade butter, which I never thought to be something I was capable of, is surprisingly easy to make. All you need is cream and a means to agitate it. A stand mixer works great.


Fifteen minutes later whipping at medium-high to high speed and it transforms from cream to butter.


Pour the butter and liquid off through a sieve, but save the liquid!! Not only did I make butter, but buttermilk as well. It is a two for one deal. The buttermilk will be used for pancakes or biscuits later.


Rinse the butter under cold water until it runs clear. Press out excess moisture and transfer to container of your choice.


One pint of cream will yield one cup of buttermilk and about one cup of butter (2 sticks). I used some cheap cream I had left over from Christmas to make this batch, but the least expensive organic cream I can find sells for $2.95 a pint. The organic butter I buy is $4.99 a pound. Organic buttermilk is $3.39 a quart. I save over $2.00 on the butter by making my own, but actually end up spending more on the buttermilk. In the end I gain a financial savings of 79 cents. Not worth the time to make your own? Consider this, in an effort to reduce packaging I started buying premium organic grass-fed local butter packaged in one paper wrapper. It retails for $6.99 a pound. Ouch! Now my savings jump to $2.79.

The real benefit for me is the package savings. I can go from two cardboard packages and four wax paper wrappers when buying the less expensive option; or, one cardboard package and one paper wrapper with the pricey stuff, down to one cardboard container when making my own. I think I can even find cream in glass at my coop. Even less waste!

I find it amusingly enjoyable and oddly empowering to make my own butter and buttermilk. Now if I could just get that bread thing figured out...

Share/Save/Bookmark

Friday, December 26, 2008

Wave Goodbye to Dishwasher Detergent.

After making the decision to lead a more sustainable life, I gave up my beloved Electrasol tabs and started the search for an eco-friendly dishwasher detergent. The first one I tried was 7th Generation Free & Clear Automatic Dishwasher Powder. I hated it. It did not get my dishes clean and left them in a cloudy haze. So I moved on to BioKleen Automatic Dish Powder. I actually like this stuff. It has a pleasant smell and does a pretty good job of cleaning the dishes. There was some residue left after the final rinse, but I was willing to live with it. Then one day I ran out. It is not available locally. I had been ordering it online from drugstore.com or Amazon. Being unprepared, I picked up a bottle of Earth Friendly Products Wave Auto Dishwasher Gel at my local grocery store.


I LOVE it! No residue, clean dishes, available locally - yes! Phosphate free, chlorine free, caustic free - Yes! Plant based and totally biodegradable - YES! Yes! Yes! Yes! Packaged in plastic - yes. What? Packaged in plastic - Oh, man. It was damn near perfect. They even have a rinse agent I like, also packaged in plastic. Shucks.

All this plastic is wreaking havoc on our planet and on ourselves. Something must be done. Scores of people have decided to cut plastic from their lives. I, too, have committed to reducing the amount of plastic my family consumes. So it is with a teary eye that I must bid adieu to my new found favorite. It was fun while it lasted.

So now what? I know, I know. 7th Generation dishwasher powder comes in a cardboard box. See above. I hate it. As much as I want it to, it just does not work for me. Surprisingly, the answer lies just on the other side of the wall of my dishwasher, in the washing machine. Huh?

Borax and Baking Soda.


Just mix equal parts borax and baking soda. Add 2 tablespoons per load.

Adjust the quantity or baking soda ratio for hard water. I have also read recipes using washing soda instead of baking soda. I store mine in a glass pickle jar under the sink. No more plastic. I have been using this combination for several weeks now with no complaints. My dishes are clean, in fact I think they are cleaner now then when I was using actual dishwasher detergent, and there is no residue left behind. Once my rinse agent runs out I will switch to white vinegar to be truly plastic free.

Share/Save/Bookmark